
by Lingel Learning | Oct 17, 2015 | Articulate, Storyline
Have you ever wondered how long your e-learning course is? Storyline allows you to do this by automatically calculating the duration of the course timeline. Follow the steps below to find out how:
How to calculate your course duration
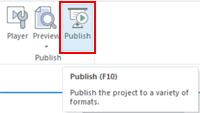
1) Click the Publish button
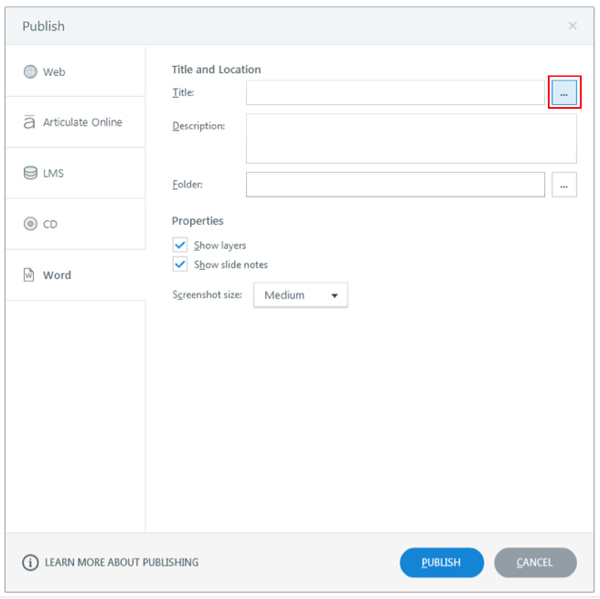
2) The following popup will appear, then click the button highlighted below:
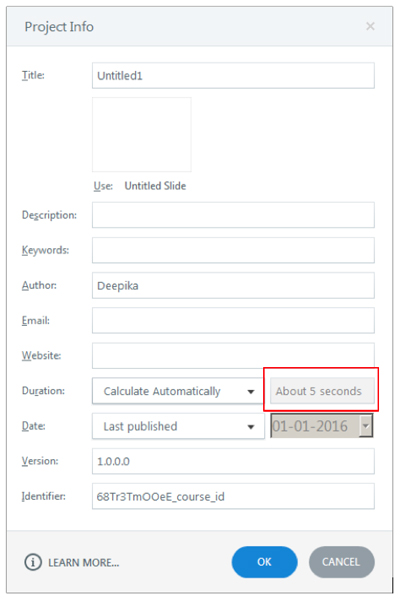
3) Next to “Duration”, highlighted below you will see the estimated course duration
by Lingel Learning | Oct 16, 2014 | Articulate, Storyline
 Articulate Storyline 2 been released and bundled with a heap of new features. Rather than go through them all we have chosen some of our favourites that will allow you to take your courses to the next level.
1. Motion Paths
We have been waiting for this feature for a long time and it doesn’t disappoint. Now you can create motion paths that can be triggered anywhere on the timeline. How often have we wished we had the ability to make objects move in Storyline like we do in PowerPoint? Now we can.
2. Dockable Panels
If you are so inclined, you can move the triggers, slide layers, timeline, states, and other panels to somewhere else on your desktop, or to a second monitor. This will let you have room to focus only on the scene you are working on.
3. Auto Recovery
I don’t know about you but I am one of those people who have opened their project to begin work and realised that I didn’t hit save last time and have lost hours of work. Now this won’t happen anymore. The Auto recovery feature allows you to start where you left off whether you didn’t save or your computer crashed.
4. Slider Interactions
This is one of my favourite new features. Storyline has created an interaction that allows users to manipulate data, explore relationships between objects and principles and to make it even better it looks great in your course.
5. Read only seek bar
Often I want a learner to have their own control over the course navigation, but still enforce some sort of time accountability on a slide. Through a read only seek bar, learners have to stay on the slide for the allotted amount of time but still have their own autonomy when clicking next. It’s a win win!
5. Trigger to hide the next button
In Storyline 2, the Trigger Wizard has new events, allowing you more options to control objects on the slide. The flexibility to hide the next button until users have completed the slide is a helpful new option that we already see ourselves using again and again.
6. Copy and Paste Layers
We see this as a huge time saver; we love having the ability to copy and paste layers. No more having to create and re-create the same layers for new slides.
7. Animation Painter
We love format painter and use it all the time. We are so excited about the new Animation painter for adding the styling to all of our animations!
8. Character Spacing
This new feature lets developers space characters any way they want. With this feature we have can make text look any way we want. Time to get creative!
9. Question Import
Remember the pain of having to manually write each question and its answers into the question field? With this new feature, we can import questions from an excel or a text file and to create assessments efficiently.
A Negative:
One thing we really wish Articulate would provide further support in is HTML 5. Although it is supported, we still find any courses that are sizeable or have videos; audio or advanced variables can have trouble on an iPad or mobile device.
www.articulate.com

by Lingel Learning | May 6, 2014 | Articulate, e-learning
Do you need to make your elearning course accessible and not sure where to start? Here are some guidelines that will help you get you started.
The official website http://www.w3.org/TR/WCAG20 is very thorough and needs to act as your final benchmark. The website http://webaim.org/standards/wcag checklist is a fantastic resource that contains a checklist for implementing the WCAG principles and techniques for categories A, AA and AAA. This tool can be used as a simple guide to ensure you cover all components.
Some tips for what you need to do in Articulate Storyline to get a start on your WCAG compliant course:
1) Add Alternative Tags to all images and buttons or content that cannot be read with a screen reader. To do this:
a) right click your image and select Image Size and Position
b) select Alternative Text
c) Describe your image/content
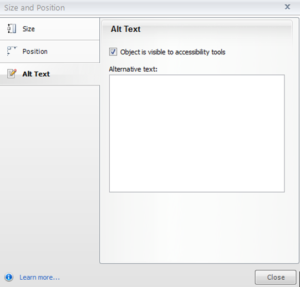
2) Make any shapes or background that is not relevant to the content hidden from the screen reader. Do this the same way you would add an Alt tab, but uncheck the box that says “Object is visible to accessibility tools”
3) Include a transcript in the notes section, or in a closed captioning box (more on this later) for any audio track or media file included in the slide. To do this, click on the notes section at the bottom of your slide and paste in any relevant text.
4) When including any links, make sure the colour contrast is 3:1. This website has a helpful contrast checking tool http://webaim.org/resources/contrastchecker
To do this:
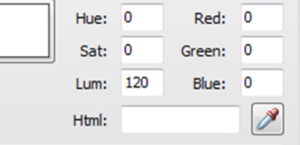
a) click on the image and select format
b) Select shape fill
c) Go to more fill colours and choose the eyedropper
d) Then click on your colour to determine the html number
e) Put this into the contrast checker website along with the other colour you are checking.
5) Text and images must have a contrast ratio of 4:5:1. Again, use http://webaim.org/resources/contrastchecker
6) Each paragraph of text has specific guidelines:
a) Must not be over 80 characters in length
b) Have adequate spacing between lines
c) Must not be fully justified
7) Keyboard must be used for all navigation control. Check this works by tabbing through the articulate course once it is published. If the learner will be using JAWS, you can find a list of JAWS keyboard shortcuts at: http://www.freedomscientific.com/doccenter/archives/training/JAWSKeystrokes.htm
These are a few tips that should get you started. For a comprehensive overview, see http://www.w3.org/TR/WCAG20

by Lingel Learning | Apr 25, 2014 | Articulate, Storyline
Have you ever been frustrated trying to align text size within a textbox in Articulate Storyline? Well the default setting when you create a textbox is to automatically adjust the text size to fit the textbox you create. To stop this from happening all you have to do is change the textbox to not auto-resize.
Simply follow the instructions below:
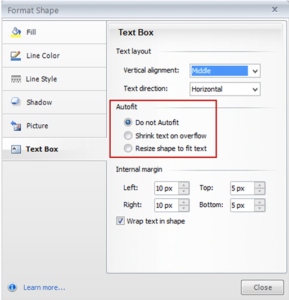
1) Right click on the textbox
2) Select Format Shape
3) Click textbox in the menu on the left
4) Under Autofit, click Do not Autofit
5) Click Close
You can make the settings, then copy and paste or multi-select boxes and then make the settings.

by Lingel Learning | Nov 2, 2013 | Articulate, e-learning, LMS
eLearning is the use of technology to enable people to learn anytime and anywhere. eLearning can include training, the delivery of just-in-time information and guidance from experts
eLearning can occur in or out of the classroom. It can be self-paced, asynchronous learning or may be instructor-led, synchronous learning. eLearning is suited to distance learning and flexible learning, but it can also be used in conjunction with face-to-face teaching, in which case the term blended learning is commonly used.
No matter how big your organization is, eLearning is a great way to manage your staff training while saving you money. Whether you need help with learning an authoring tool, or would just like a demonstration of a Learning Management System, Lingel Learning can set you up for success.
What do you need to get started with Online Training
Step 1 – Selecting an authoring tool
In order to create eLearning courses the first thing you need is an authoring tool such as Articulate Storyline. There are many tools on the market, some are standalone tools specifically designed to make it easier to create interactive courses. Others require authoring courses in PowerPoint, then uploading and publishing the courses using the authoring tool.
Selecting the right tool is important, let Lingel Learning help you choose the right authoring tool for your eLearning requirements.
Step 2 – Creating an eLearning course
No matter what authoring tool you select, learning should be creative, engaging, and most of all authentic. Whether it’s an IT consultant learning to use new software, a nurse refreshing her CPR qualification or a business analyst refreshing his OHS knowledge, all people learn differently.
If you need help getting started with creating courses, Lingel Learning offers a one day workshop we will have you developing and publishing their own eLearning course, no matter how new you are to eLearning. We also provide course development and consulting services.
Step 3 – Selecting a Learning Management System
A Learning Management System (LMS) is a software package that enables the management and delivery of learning content and resources to students. LMS systems are web-based to facilitate “anytime, anywhere” access to learning content and administration. One of the industry leading LMS tools is Moodle™, Lingel Learning can demonstrate an LMS and showcase what it has to offer.

Recent Comments