by Lingel Learning | Apr 29, 2025 | Articulate, Articulate 360, e-learning, LMS, Moodle, Rise, Storyline
Sharable Content Object Reference Model (SCORM) plays a pivotal role in e-learning, facilitating the creation, sharing, and tracking of training materials across platforms. Moodle, as a leading Learning Management System (LMS), offers extensive support for SCORM, allowing educators to deliver and manage SCORM packages effectively. This article dives into the SCORM settings in Moodle, offering insights on configuration, best practices, and leveraging SCORM for effective learning.
Overview of SCORM
SCORM, the de facto industry standard for e-learning content, specifies how online learning materials and Learning Management Systems communicate and interact. It ensures content compatibility and tracking across different LMS platforms.
The Importance of SCORM in E-Learning
SCORM’s universal standards for content interoperability and tracking make it indispensable in the realm of e-learning. It allows educators to create modular and reusable learning objects that can be easily imported, tracked, and reported within Moodle.
Setting Up SCORM in Moodle
To get started with SCORM in Moodle, educators need to upload their SCORM packages through the course administration panel. This process involves basic configuration options like defining the package name, description, and uploading the SCORM zip file.
Basic Configuration Options
- Name and Description: Clearly define the name and provide a description of the SCORM activity.
- Uploading SCORM Packages: Upload the .zip file containing the SCORM package. Moodle automatically unpacks and processes the content.
Advanced SCORM Settings
Moodle offers advanced settings to tailor how SCORM packages are presented and how learner interactions are tracked.
Appearance Settings
- Display Options: Customise how the SCORM package appears to learners, including options for window size and display features.
Availability and Access Restrictions
- Access Control: Set availability dates and prerequisite conditions for accessing the SCORM activity.
Tracking Settings
- Attempt Management: Configure settings related to learner attempts, including the number of attempts allowed and how they are handled.
Grading and Completion Settings
- Grading Methods: Choose how scores from SCORM packages are calculated and reported in Moodle’s gradebook.
- Completion Criteria: Specify criteria for marking the SCORM activity as completed, such as viewing a certain percentage of slides or achieving a minimum score.
Best Practices for Using SCORM in Moodle
- Optimise SCORM Content: Ensure SCORM packages are optimised for web delivery, keeping file sizes reasonable and navigation intuitive.
- Troubleshooting Common Issues: Familiarise yourself with common SCORM issues in Moodle, such as tracking problems or content display issues, and know how to address them.
Leveraging SCORM for Effective Learning
Integrating SCORM packages with Moodle’s activities and resources can create a rich, interactive learning environment. Blended learning strategies, combining SCORM with forums, quizzes, and assignments, can significantly enhance learning outcomes.
SCORM Compliance and Compatibility
Ensuring SCORM Compliance: When creating or sourcing SCORM packages, ensure they are compliant with SCORM 1.2 or 2004 standards for seamless integration with Moodle.
Compatibility with Different Moodle Versions: Check compatibility between SCORM versions and your Moodle installation to prevent issues with content uploading and tracking.
SCORM settings in Moodle offer a robust framework for delivering, tracking, and managing e-learning content effectively. By understanding and leveraging these settings, educators can enhance the learning experience, ensuring that content is not only engaging and interactive but also compliant and trackable across platforms. As e-learning continues to evolve, the integration of SCORM in Moodle remains a key component in delivering high-quality, standardised education globally.

by Lingel Learning | Jan 8, 2024 | Articulate, Articulate 360, e-learning, LMS, Moodle, Storyline
This blog post aims to assist users to better understand the new improvements made to the activity completion settings for SCORM packages in Moodle 4.1 when compared to Moodle 3.9.
Throughout this article, we will use Moodle 3.9 as a baseline example and compare how these same activity completion settings function in Moodle 4.1 for SCORM packages.
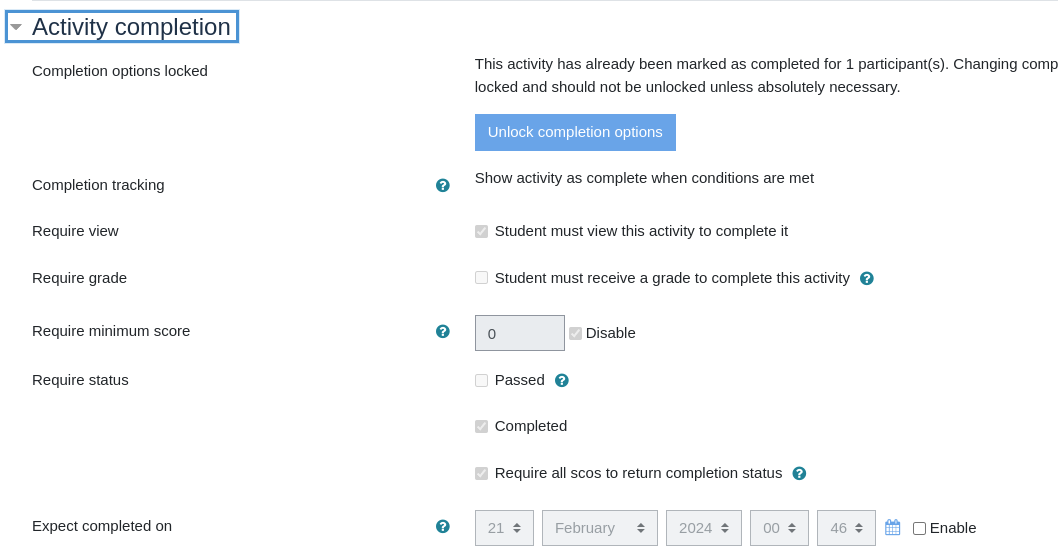
Let’s begin by setting up a SCORM activity in Moodle 3.9 with the following activity completion criteria defined:
In this example, for the activity to be marked complete for the user, they are required to:
- View the activity
- Require status
- Achieve Completed status
- Or, Require all scos to return completion status
Note: Based on the criteria defined above, in Moodle 3.9 and below, users must satisfy both the View activity criteria, and require one of the selected statuses (Completed, or Require all scos to return completion status) for the Require status criteria to be satisfied.
Now let’s have our test user attempt the SCORM package:
The user has achieved a ‘Passed’ status on the SCORM attempt and will have the SCORM activity module marked complete on their course page:
This activity was marked complete because they satisfied the “View activity” and “Require all scos to return completion status” criteria. In summary, as long as one of the Require status criteria is met, it will satisfy the entire condition.
Now let’s attempt the above process in Moodle 4.1 to demonstrate the improvements and how they function differently from Moodle 3.9.
With the SCORM package activity completion setup identically to Moodle 3.9 above, here is how the SCORM package will appear for our students on the course page:
You will notice that the first difference is that the individual activity completion criteria are displayed to users on the course page.
Let’s have our user attempt this SCORM package:
The activity will appear as follows for the user on the course page:

Despite the package returning a ‘Passed’ status similar to Moodle 3.9, the activity is not marked complete for this student. Even though the packages are setup identically in Moodle 3.9 and Moodle 4.1, the package calculates activity completion differently in Moodle 4.1. In this updated version of Moodle, the activity completion criteria requires the student to satisfy ALL the criteria defined. In this scenario, the user is required to:
- View the activity
- Require the completion status (Complete the activity)
- Require all scos to return completion status. (Do all parts of this activity)
In summary, for the Require Status completion criteria to be marked complete, the user is required to satisfy both the nested conditions (Complete the activity and Do all parts of this activity) for it to be met. Comparing this to Moodle 3.9, the user was only required to satisfy one of the nested conditions.
If you find that the activity completion requirements are no longer being met in your updated site we advise updating these settings for the SCORM activity by selecting only one of the choices for ‘passed’, ‘complete’ or ‘require all scos to return completion status’. You can apply this by:
- creating a new SCORM activity and hiding/restricting the old one,
- creating a new version of the course using the backup and restore functionality, updating the SCORM activity completion settings and enrolling new users into the updated version moving forward
- unlocking the activity completion requirements and updating the current settings. If choosing to unlock the activity completion requirements, it is important to consider the implications of the loss of data by performing this action.
by Lingel Learning | Nov 4, 2017 | Articulate, Articulate 360, e-learning, Storyline
We provide a lot of training using the Articulate software and one of the most common questions we are asked is which one of these products will give me the best value? Which one is the most user friendly?
There is no right or wrong answer because both will help you create captivating online courses. The question should be which one is more appropriate for the elearning I am creating?
We rounded up the details of both new Articulate software below.
Articulate 360
Articulate 360 comes with a variety of tools as opposed to Storyline 3 which just gives you the upgraded version of Storyline 3.
With your subscription to 360, you get access to the following tools:
- Storyline 360 – Industry standard for creating interactive elearning SCORM content
- Studio 360 – Transform PowerPoint presentations into Courses.
- Rise 360 – Build fully responsive courses in minutes, right within your web browser.
- Content Library 360 – An ever-expanding source of course assets, with over 3 million images/videos + characters & slide templates.
- Review 360 – Simplify project reviews with your stakeholders with instant upload & sharing, comments, and notifications.
- Replay 360 – Record and edit personalised screencastsn.
- Peek 360 – Record screencasts and instantly upload to Review for sharing.
- Articulate 360 Training – Gives you the training you need from eLearning experts.
One nice new feature available in Storyline 360 is Text-to-Speech, it allows you to convert text to speech right in 360. This is a powerful feature, we still feel the voice narration created sounds a little computer generate.
Articulate 360 is a subscription-based software. This means you have to pay a monthly fee for all that Articulate 360 has to offer. This is ongoing, so if you only want to fork out the payment one time, this solution probably isn’t for you.
Articulate Storyline 3
Storyline 3 is the same great product that we have come to know and love. Storyline 3 is a perpetual license, which means you pay the lump sum for it now and don’t have to pay again, that is until the new version of Storyline comes out and you want to upgrade.
Storyline 3 comes with the added features:
- Allows you to structure text with tables, which can be great for organizing your content.
- Create and add closed captions. We have worked with WCAG and Section 508 in the past and this feature is an added bonus if you do any work for disabled employees.
- The motion paths are much more advanced and new trigger events let you create content that is more game- like.
- A new responsive player that will look great on tablets and mobile phones.
To put it simply, Storyline 3 is an upgraded version of your old Storyline. If you only want to spend the money once, are happy with your current Storyline 2 and don’t need access to a reviewing tool or the content library, this is the product for you. If you are happy to go with a subscription, Articulate 360 gives you access to more tools to work with. It is continually getting upgraded so you reap the benefits of the advancements.
Still not sure, click here to compare features across all Storyline versions.

by Lingel Learning | Jun 20, 2016 | Articulate, Storyline
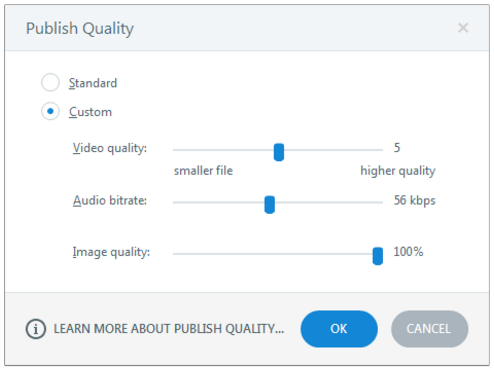
If you have large images, audio or video in a Storyline file and you need to reduce the size of your published output, simply edit the quality settings by following the steps below:
1) Click the Publish button
2) Under Properties, Quality: click Custom optimization
3) Click Custom and then adjust the Video, Audio and Image quality.

by Lingel Learning | Oct 17, 2015 | Articulate, Storyline
Have you ever wondered how long your e-learning course is? Storyline allows you to do this by automatically calculating the duration of the course timeline. Follow the steps below to find out how:
How to calculate your course duration
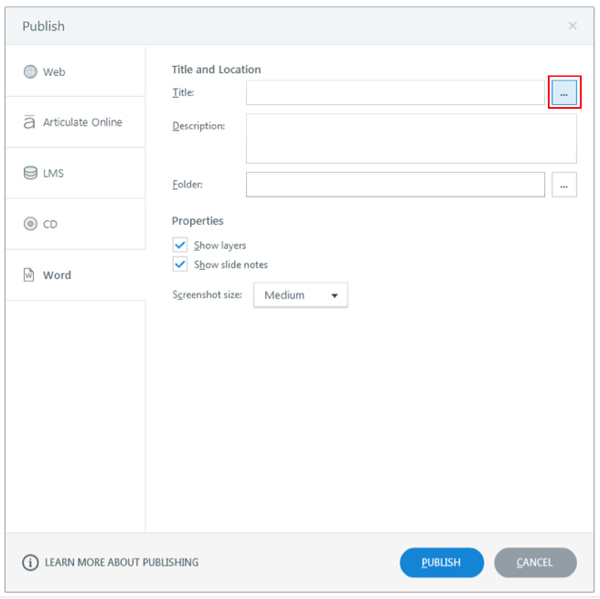
1) Click the Publish button
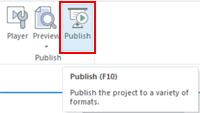
2) The following popup will appear, then click the button highlighted below:
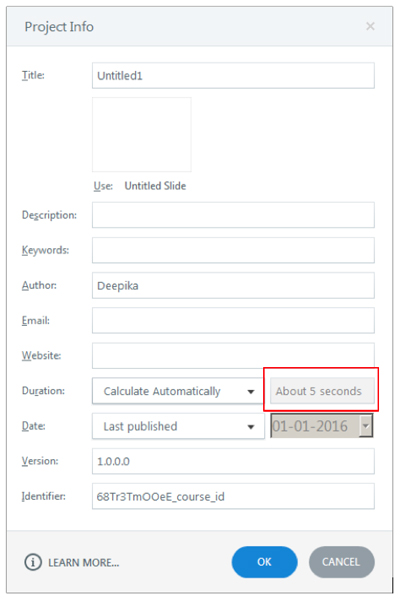
3) Next to “Duration”, highlighted below you will see the estimated course duration

by Lingel Learning | Oct 16, 2014 | Articulate, Storyline
 Articulate Storyline 2 been released and bundled with a heap of new features. Rather than go through them all we have chosen some of our favourites that will allow you to take your courses to the next level.
1. Motion Paths
We have been waiting for this feature for a long time and it doesn’t disappoint. Now you can create motion paths that can be triggered anywhere on the timeline. How often have we wished we had the ability to make objects move in Storyline like we do in PowerPoint? Now we can.
2. Dockable Panels
If you are so inclined, you can move the triggers, slide layers, timeline, states, and other panels to somewhere else on your desktop, or to a second monitor. This will let you have room to focus only on the scene you are working on.
3. Auto Recovery
I don’t know about you but I am one of those people who have opened their project to begin work and realised that I didn’t hit save last time and have lost hours of work. Now this won’t happen anymore. The Auto recovery feature allows you to start where you left off whether you didn’t save or your computer crashed.
4. Slider Interactions
This is one of my favourite new features. Storyline has created an interaction that allows users to manipulate data, explore relationships between objects and principles and to make it even better it looks great in your course.
5. Read only seek bar
Often I want a learner to have their own control over the course navigation, but still enforce some sort of time accountability on a slide. Through a read only seek bar, learners have to stay on the slide for the allotted amount of time but still have their own autonomy when clicking next. It’s a win win!
5. Trigger to hide the next button
In Storyline 2, the Trigger Wizard has new events, allowing you more options to control objects on the slide. The flexibility to hide the next button until users have completed the slide is a helpful new option that we already see ourselves using again and again.
6. Copy and Paste Layers
We see this as a huge time saver; we love having the ability to copy and paste layers. No more having to create and re-create the same layers for new slides.
7. Animation Painter
We love format painter and use it all the time. We are so excited about the new Animation painter for adding the styling to all of our animations!
8. Character Spacing
This new feature lets developers space characters any way they want. With this feature we have can make text look any way we want. Time to get creative!
9. Question Import
Remember the pain of having to manually write each question and its answers into the question field? With this new feature, we can import questions from an excel or a text file and to create assessments efficiently.
A Negative:
One thing we really wish Articulate would provide further support in is HTML 5. Although it is supported, we still find any courses that are sizeable or have videos; audio or advanced variables can have trouble on an iPad or mobile device.
www.articulate.com




 Articulate Storyline 2 been released and bundled with a heap of new features. Rather than go through them all we have chosen some of our favourites that will allow you to take your courses to the next level.
Recent Comments