Learning Tools Interoperability (LTI) is a learning technology standard developed by IMS Global Learning Consortium. LTI acts as a medium to integrate learning tools (virtual applications developed by providers) into another platform, which is the tool consumer. Moodle can be both an LTI tool consumer and provider; we can export content available in a Moodle instance as a resource to other platforms, and we can also import content from other providers into Moodle.
Using Moodle as an LTI consumer
Teachers can use the External tool to link external resources from LTI compliant platforms to their Moodle course page and also have users’ grades sent into Moodle from where they are being externally calculated. This means that users can conveniently just log into Moodle to access resources without having to go to the provider’s platform with a separate login.
The following instructions need to be followed to set this up:
1) In a course, find and click on the Turn editing on button
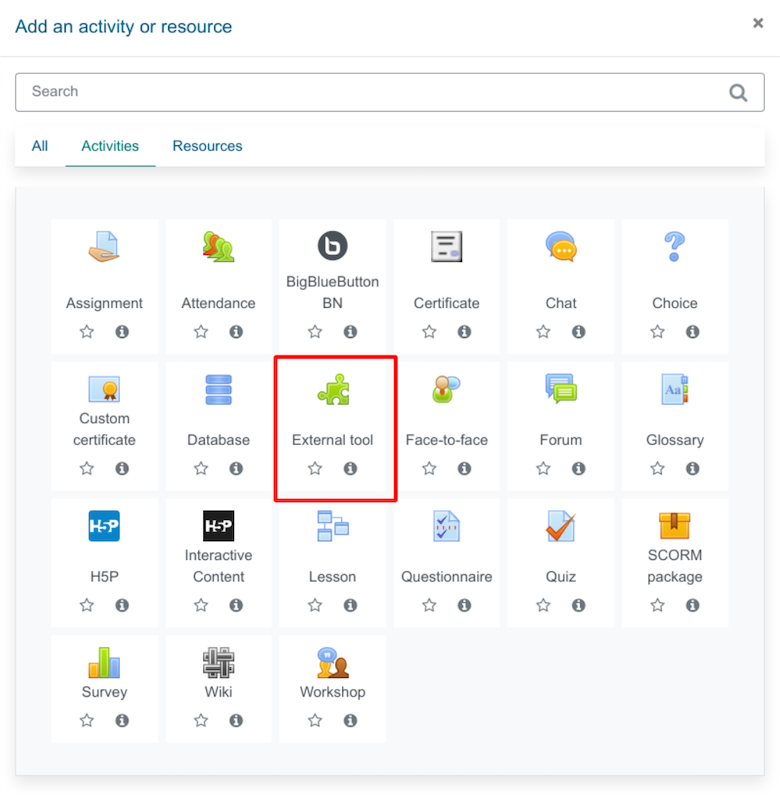
2) Go to the desired course section and click on the Add an activity or resource button
3) In the pop-up that opens, go to the Activities tab and click on the option External tool

4) Save the changes
External tool settings
This section covers the settings of the External tool activity when it is added to a course and also the site administration level settings for the course module.
The activity settings have eight different setting groups. Except for General and Privacy settings, which are specific to the External tool, the remaining groups are general activity settings that you can read more about from these links:
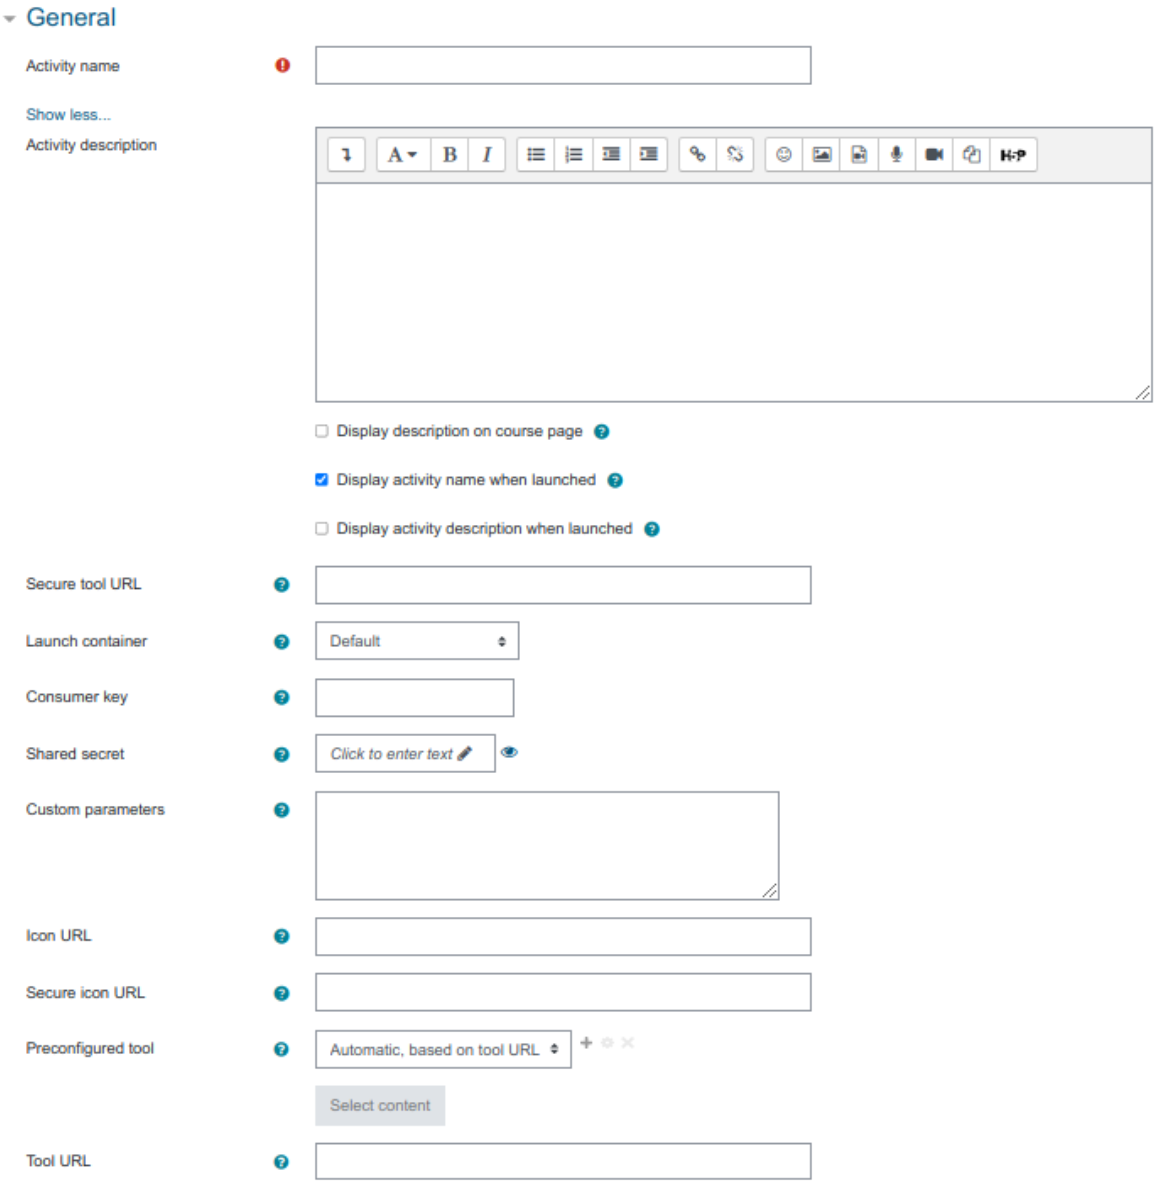
General Settings

- Activity name
- Add a title, description if required, with your choice of display
- Activity description
- Give a short description here
- Display description on course page
- Choose to show the description along with the activity name
- Display activity name when launched
- Have this appear when the student clicks the link.
- Display activity description when launched
- Have this appear when the student clicks the link.
- Secure tool URL
- This overrides the tool URL when moodle uses SSL (if your site is configured to use HTTPS in the web root)
- Consumer key
- This tells the External tool’s site that your Moodle is allowed to connect.
- The site will issue you with this key
- If you are merely linking to a tool with no secure access or gradebook sharing, you won’t need a consumer key
- If you are linking to a course or activity from another Moodle site, you can add any consumer key
- Shared secret
- This is the authentication passphrase to connect to the External tool’s site
- Custom parameters
- The tool provider might use this to allow you to display a specific resource
- This setting may be left blank for most External tools
- Icon URL
- Enter the URL to a different icon you want to display instead of the default External Tool icon
- Secure Icon URL
- Enter the URL of a different icon here if your students are accessing Moodle securely via SSL
- Preconfigured tool
- This is how Moodle communicates with the tool provider. If in doubt, leave as default
- If your administrator has made a tool available site-wide, you will be able to select it here
- Select content button
- This button is for LTI Content-Item configuration
- Tool URL
- This is the URL for connecting to the tool’s external site.
- If your Moodle site uses SSL (is on HTTPS), you will only be able to use a tool that also uses SSL. Make sure the tool URL has HTTPS before attempting to use it or you may get a blank page
- Launch container
- This is how the External tool will be displayed and one of the following options must be picked:
- Default – If in doubt, leave as default
- Embed – The External tool will be embedded in the Moodle course page with blocks and navigation bar
- Embed without blocks – The External tool will be embedded in the Moodle course page but without blocks
- New Window – The External tool will open in a new window (a new window or tab will open with the External tool and the old browser window containing the course page will not change)
- This is how the External tool will be displayed and one of the following options must be picked:
Privacy

- Share launcher’s name with the tool
- The student’s name will be displayed on the connected External tool site
- Share launcher’s email with the tool
- The student’s email will be displayed on the connected External tool site
- Accept grades from the tool
- The connected External tool site will send back grades to Moodle’s gradebook
- This will be discussed in more detail
Site administration settings
Adding a tool site-wide
A site administrator can manually configure External tools from Admin dashboard > Site administration > Plugins > Activity modules > External tool > Manage tools to render them available across the site.
A tool can be configured so that it is shown in the course module selection pop-up menu when adding an activity/resource to a course.
Registering a tool using a cartridge
A cartridge can be used to register a tool type. This will configure all the necessary settings info so you don’t need to from the settings page. Enter the tool’s cartridge URL into the “Tool URL…” field and click on the Add button, as shown in the screenshot below.

Then, you will be asked to enter a consumer key and shared secret. If you do not possess these, you can leave the fields blank.

Registering an External tool
To register an External tool, enter the tool URL into the same “Tool URL…” field and click on the same Add button. This will open the tool and prompt you to provide some settings.

Then, you will be shown the capabilities the tool wants to use and you can decide if you want to proceed with it.
Viewing more details
On the Manage tools page, you can also go to Manage preconfigured tools to view the preconfigured tools under Active, Pending, Rejected tabs.

You can also go to Manage external tool registrations to view the tool registrations under Configured, Pending, Accepted, Rejected tabs.

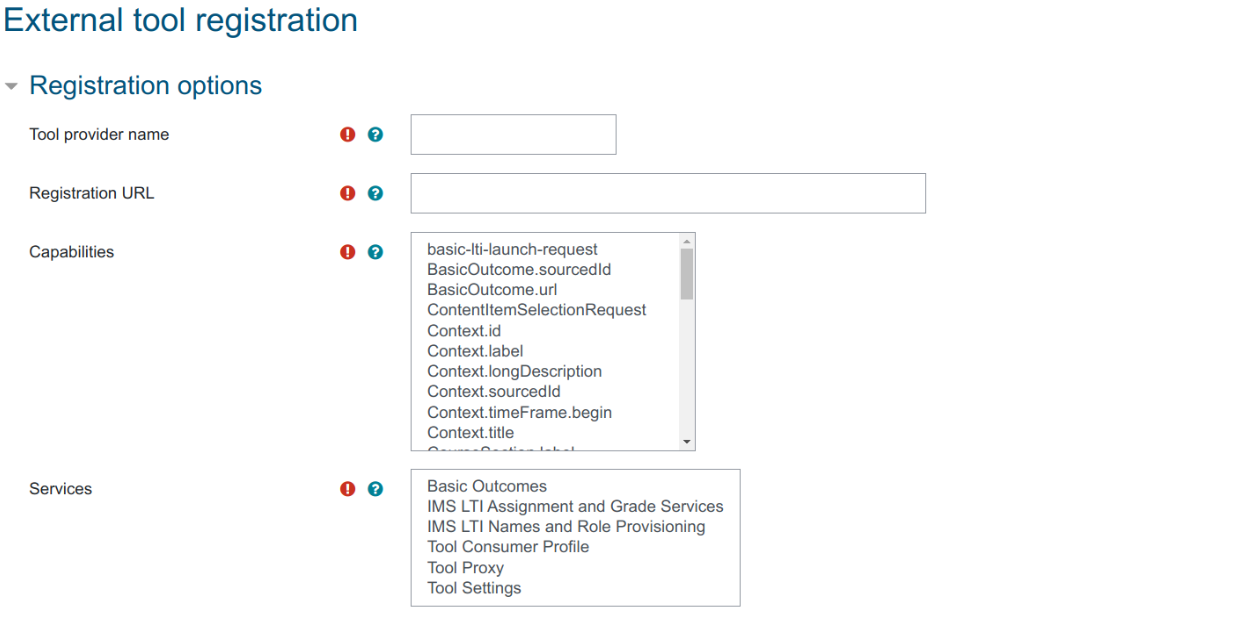
From here, you can click on Configure a new external tool registration to add a tool with limited capabilities.

- Tool provider name
- Name given by the provider
- Registration URL
- URL given by the provider
- Capabilities
- Select all capabilities you want the provider to have
- Services
- Select all services you want to offer the provider
Once you have configured these settings and saved the page, click on the checkmark to register.

After a success message is displayed, click Register to complete the registration process.

If all requirements are met, you will be able to register automatically. Now, you can go to Admin dashboard > Site administration > Plugins > Activity modules > External tool > Manage external tool types and click on the Pending tab, then click the checkmark to activate it.

External tool capabilities
You can read about each of the External tool capabilities in further detail from these links:
- Add course-specific tool configurations
- Add a new external tool
- Add a manually-configured tool
- Add a preconfigured tool
- Submit a tool to admins for configuration
- Be an admin when the tool is launched
- Edit external tool activities
- View external tool activities
Note: You can view a list of LTI certified tools from IMS Global at this link.
Using Moodle as an LTI tool provider
The enrolment plugin Publish as LTI tool and the LTI authentication plugin can be used to allow remote users on a different platform to access select courses and activities/resources on your Moodle site.
Since the users need to access content on the Moodle site, they need an account for the site and need to be enrolled in the appropriate course, which is why both those plugins are needed for LTI tool provider functionality.
Enabling ‘Publish as LTI tool’ at the site level
Site administrators can enable the ‘Publish as LTI tool’ authentication plugin from Admin dashboard > Site administration > Plugins > Authentication > Manage authentication.

Site administrators can enable the Publish as LTI tool enrolment plugin from Admin dashboard > Site administration > Plugins > Enrolments > Manage enrol plugins.

Note: It is recommended that site administrators set Allow frame embedding to ‘enabled’ from Admin dashboard > Site Administration > Security > HTTP security so that tools are displayed within a frame rather than in a new window. We recommend that you use HTTPS on your Moodle instance. Please see Transitioning to HTTPS for more information.
Sharing access to a course or activity
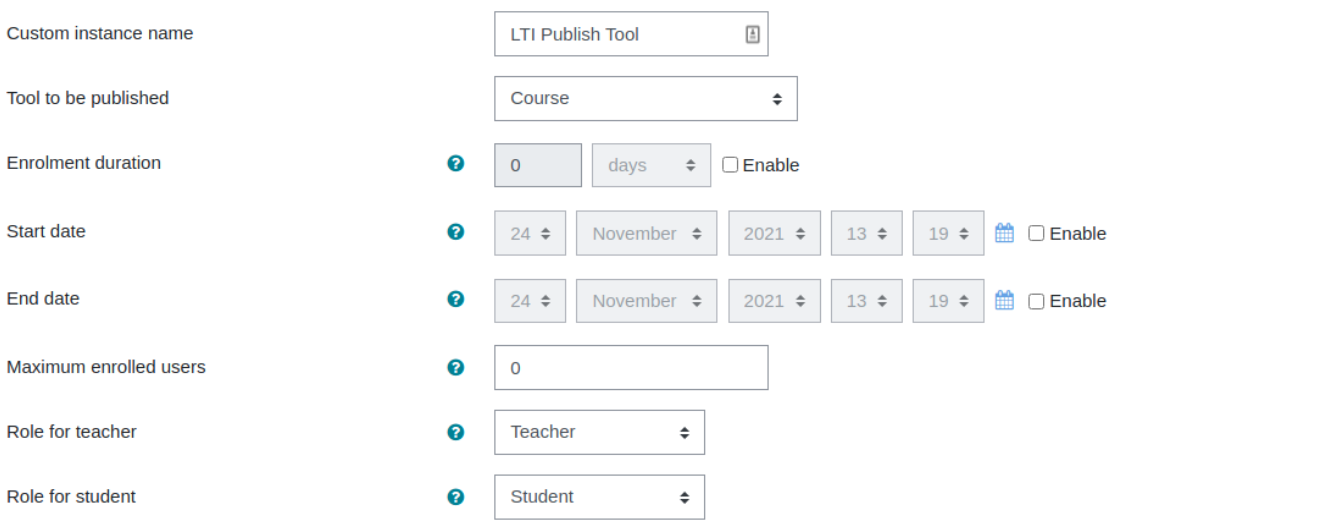
Go to the enrolment methods page within a selected course and add the Publish as LTI tool enrolment method.
Begin by providing a custom instance name, and the activity within this course (or the course itself) that you wish to share to external users. In addition, you may wish to provide an optional enrollment duration, and date range for which external users may have access to the shared material. Furthermore, a maximum number of enrolled users can be specified (if this is set to zero then an unlimited number of remote external users may be enrolled). Lastly, a role can be provided for both the remote teacher and student roles.

Next, the teacher should specify the credentials and settings for the remote external system.

- Secret
- A string of characters which is shared with the remote system (LTI consumer) to provide access to the tool.
- Grade synchronization
- Whether grades from the tool are sent to the remote system (LTI consumer).
- Require course or activity completion prior to grade synchronization
- Teachers can specify whether a course or activity should be completed before the grade synchronization is to be triggered.
- User synchronization
- Whether a scheduled task synchronizes enrolled users in the remote system with enrolments in this course, creating an account for each remote user as necessary, and enrolling or un-enrolling them as required. If set to “No”, at the moment when a remote user accesses the tool, an account will be created for them and they will be automatically enrolled.
- User synchronization mode
- Whether remote users should be enrolled and/or unenrolled from this course.
Finally, the course creator or teacher may set up default user values for remote external users.

After you have successfully added the LTI enrolment method to your course, you can navigate to the Course administration page to view and copy the registration URL for the LTI consumer site. Go to the Published as LTI tools page from the drop down menu.
Note: You should share the registration URL and secret key with the LTI consumer site in order for them to access your site. The above links will be different for your Moodle instance, but relatively follow the same format such as “http://yourmoodlesite.com/enrol/lti/”.
For more information on the Publish as LTI tool plugin, please read the Publish as LTI tool Moodle article.


Recent Comments