Have you ever wanted to create additional fields to store information about users? Follow the instruction below to find out how:
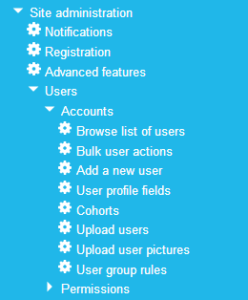
1) Go to Site Administration block (Administration in version 2.5 and above)

2) Click Users
3) Click Accounts
4) Click User profile fields
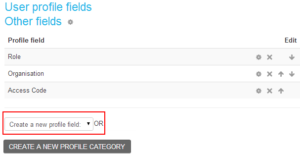
5) From the User profile fields screen click Create a new profile field select box

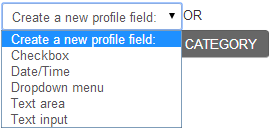
6) Select the most appropriate field you would like to create (e.g. Text input)
Checkbox (values can be true or false/yes or no/on or off)
Date/Time (date and an optional time field)
Menu of choices (selection of a value from a pre-defined list)
Text area (multiline formatted text)
Text input (single line of text or a number)

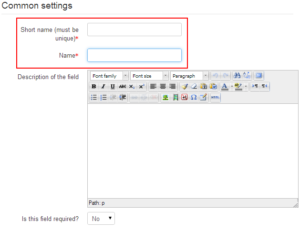
7) Click Text input and the common page settings will appear. Please note you must complete all required fields, denoted by a *
8) Under Common Settings, Enter a Short Name
9) Enter a Name

Please note the following fields are optional under the Common Setting:
Is this field required? – Set to Yes, if the field is to be made compulsory
Is this field locked? – Set to Yes, if the field will be locked to prevent the user from modifying it
Should the data be unique? – Set to Yes, if the value entered needs to be unique
Display on signup page? – Set to Yes, if the new field needs to be displayed on the signup page. (e.g. additional fields such as the address or previous qualifications)
Who is this field visible to? – This field can be set to one of the three visibility settings (Not visible, Visible to user and Visible to everyone)
Category – must be selected from the list of created values entered before the specific settings can be provided for each field type. Only newly-created categories can be selected. Default categories cannot be selected
Please note the following fields are optional under the Specific Setting:
Default value – defines a default value in a free-form textbox
Display size – size of textbox
Maximum length – length of textbox
Is this a password field? – specified if the field is a password field
Link – used to create dynamic links
Link target – where the link will be opened once selected
10) Click Save Changes


Recent Comments