
by Lingel Learning | Sep 15, 2017 | LMS, Moodle
We see poorly managed and implemented Learning Management System’s on a regular basis, whether it’s installing a corrupt plugin or changes to Moodle’s core code can result in a sluggish, error prone environment, frustrated users and poor user adoption.
How do you check if your Moodle LMS needs a health check?
Check Installed Plugins
You should always be mindful of installing too many plugins on your production site as it does affect the performance. Another issue is that you might have installed plugins in the past that were not brought forward with major upgrades done in the past. You can go to the plugin overview page as described below and look for the following:
- To check your active plugins navigate to Site Administration > Plugins > Plugins overview
- Review all the installed plugins in your LMS and see if they are being used and are still available
- Only install thoroughly tested plugins

Check Filters
Too many filters can also slow down the site as they run through the content before it is displayed on the site.
- To check your filters navigate to Site Administration > Filters > Manage Filters
- Review all the installed filters in your LMS and see if they are actually needed.

Check your Moodle version
Moodle releases both minor and major updates in a regular support cycle.
- To check what version your Moodle is navigate to Site Administration > Notifications
- We recommend you should always implement minor updates (security patch and incremental updates); however with major version upgrades we recommend you wait six months after its released prior to upgrading.

Enable Debugging Messages
This can be used to display information regarding any underlying problem. This also helps in determining if all the plugins follow the standard Moodle coding guidelines.
- To turn debugging on navigate to Site administration > Development > Debugging
- Check “Display debug messages”
- It will then start displaying debugging info on top of each screen

Moodle’s Core Code
Moodle allows you to customise it’s core code; however this may lead to problems in the future when it comes to minor and major upgrades. When working with a vendor, make sure you understand the changes they are making to your Moodle. If they intend on making changes to your Moodle core code, make sure it’s fully documented.
We recommend that you start by talking to your vendor and ask them if they have made any changes to your Moodle’s core.
What’s included in a Lingel Learning LMS Health Check:
- Detailed audit of your LMS
- Assessment of all plugin’s installed on your LMS
- Database review
- Recommendations on how to improve your LMS
Book your LMS health check today! You don’t even need to host your LMS with us.

by Lingel Learning | Jun 2, 2015 | LMS, Moodle
If you want to set up paid courses, you can enable PayPal enrolment method. The PayPal enrolment plugin has to be enabled by the site administrator and then either administrator or manager can add the payment method to the course.
Let us take you through a step by step procedure on how to enable paid enrollment on a course in Moodle.
Course settings for PayPal
1) Go to your course and then click Settings > Course Administration > Users > Enrolment methods
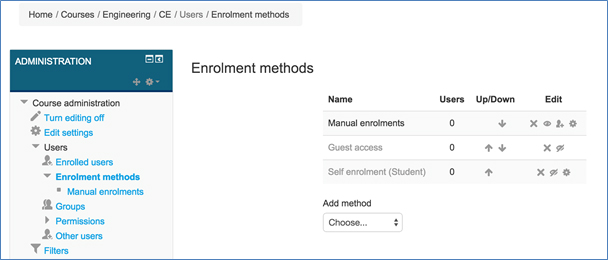
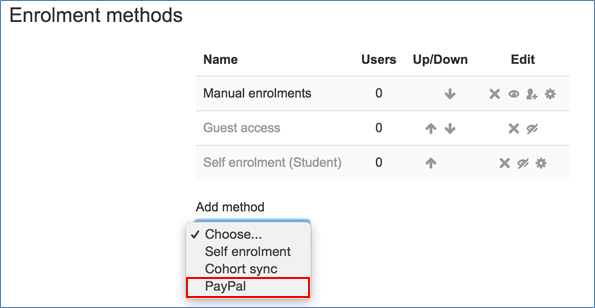
2) If you do not find PayPal enrolment method in the list, you can choose PayPal from “Add Method” drop down list.
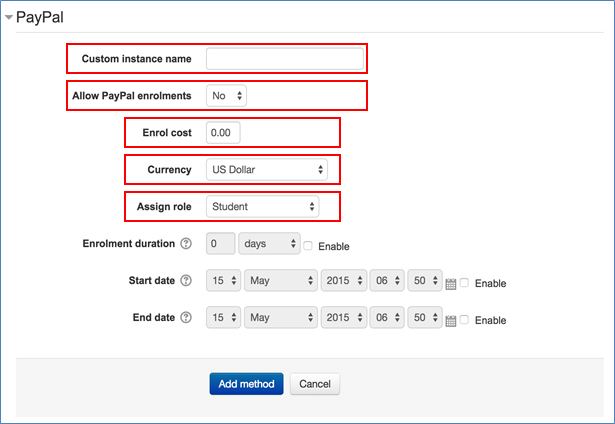
3) When you choose PayPal from the dropdown list, you will be directed to PayPal course settings page where you can configure the following information.
- Define a name “Custom Instance Name”
- Choose “Yes” for Allow PayPal enrolments
- Enter the cost of your course in “Enrol cost” filed.
- Choose an appropriate currency from the “Currency” List
- Select Student for the “Assign role”. If you have any special reason for allowing other users to enroll, you can choose other options.
- Enter the enrolment duration, start date and end date. These fields are optional.
- Click the “Add Method” button and save your changes.
4) Now you have enabled the payment method of “PayPal” to your course.
Admin Settings
If you do not have the ‘PayPal’ option in the ‘Add method’ dropdown list, you need to enable the plugin for ‘PayPal’ paid enrollment method.
1) Go to Settings > Site Administration > Plugins > Enrolments > Manage enroll plugins
2) Enable ‘PayPal’ plugin by clicking the ‘eye’ symbol
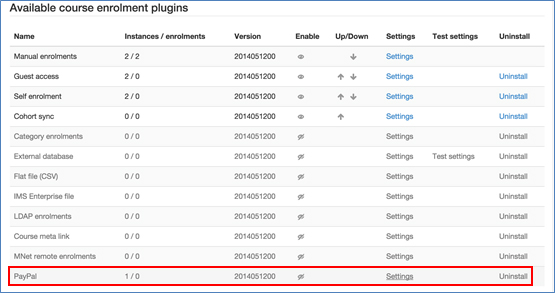
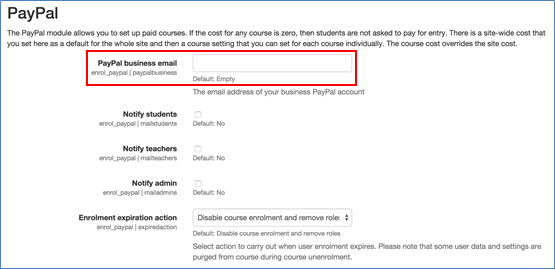
3) After you have enable the ‘PayPal’ plugin, Click the ‘Settings’ link, it will then direct to the PayPal settings page where you can configure the following information:
- Enter the email of your Business PayPal account.
- Choose the notify options for students, teachers or admin
- Select Enrolment expiration action
- You can choose to allow the PayPal enrolment plugin by default in new courses by selecting ‘Yes’ option.
- Enter a default cost value and currency
- Choose a default role assignment (e,g. student)
- Given a default enrolment period
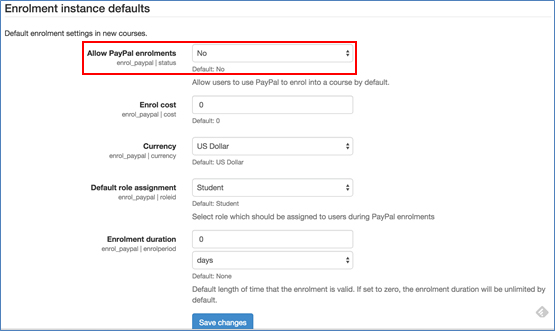
Finally click the ‘Save Changes’ button to save and complete the PayPal’ enrolment plugin.

by Lingel Learning | Mar 5, 2015 | LMS, Moodle
Moodle has logs that can be accessed at site and course level. Logs are activity reports that can be filtered by required fields such as day, participants, activity, action or site.
Site activity logs
To generate your own site activity logs, following the steps below. (Please note you must have the administrator role)
1) Go to Settings > Site Administration > Reports > Logs
2) Select your desired logs by choosing options from dropdown lists

3) Click “Get these logs” button to view the list of logs
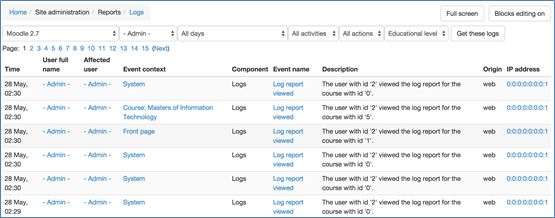
This list of logs activity describe all the information about log time, user name, what event occurred, which page, description with key fields and which IP address was used.
In the bottom of the list, there is “Download” button. Choose an option from the dropdown list and select which format (Excel or text or html) you want to download. Then click the “Download” button and save the log report.

You can view all logs by clicking the page numbers at the bottom of the window.

by Lingel Learning | Jan 19, 2015 | LMS, Moodle
Have you ever experienced trouble with your Articulate Storyline scorm files reporting back to Moodle?
You may experience this issue if your SCORM files do not have an assessment and you are relying on the SCORM file to Track using the number of slides viewed.

To ensure Moodle registers a learner’s completion it is recommended that you turn Force completed on in the SCORM setting.
To do this simply follow the instructions below:
1) Open your SCORM Settings
2) Navigate to Compatibility settings
3) Select Yes on the select box under Force completed
4) Click Save and return to course


by Lingel Learning | Sep 28, 2014 | LMS, Moodle
Have you ever wanted students to be able to self-enrol in a Moodle course? Let us take you through a step by step on how to enable self-enrolment in Moodle.
1) Click Course administration
2) Click Users
3) Click Enrolment methods

4) Click on the words Enrolment methods and you will see that Self enrolment (Student) is disabled
5) Click on the closed eye button to enable Self enrolment feature
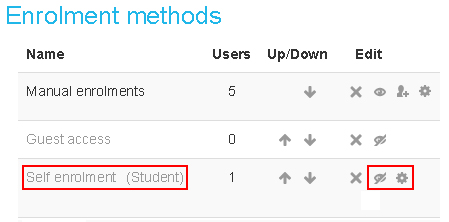
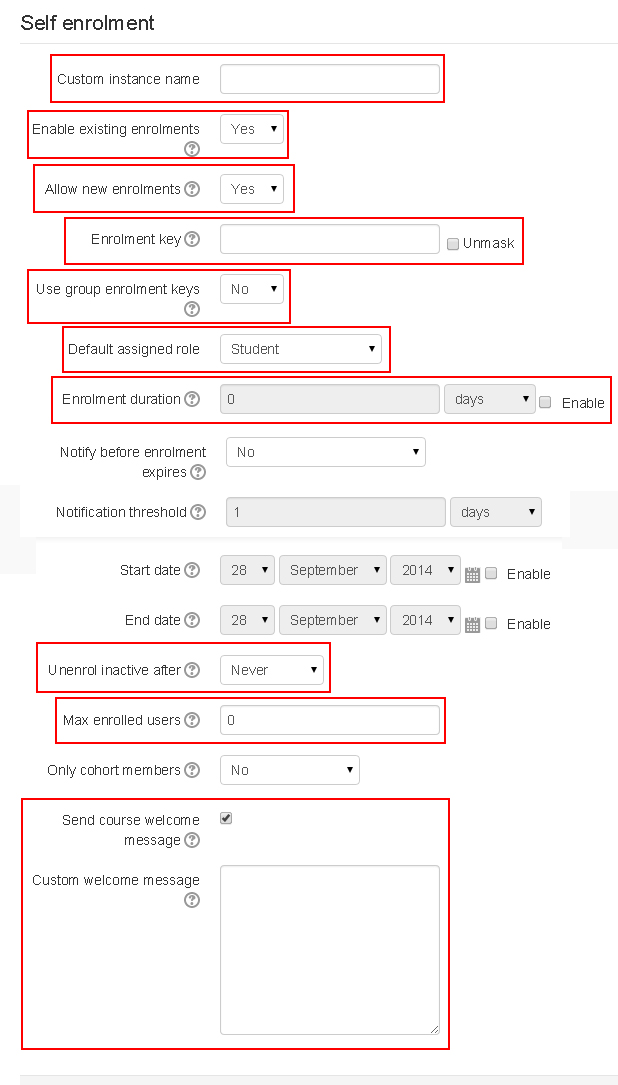
6) Click the Edit button to change the Settings of the Self Enrolment. Below outlines key fields you should be aware of:
a) Custom instance name – changes the default name from Self enrolment (Student) to a chosen name
b) Enable existing enrolments – if disabled all existing self enrolments are suspended and new users can not enrol.
c) Allow new enrolments – this setting determines whether a user can enrol into the course.
d) Enrolment key – an enrolment key enables access to the course to be restricted to only those who know the key. If the field is left blank, any user may enrol in the course. If an enrolment key is specified, any user attempting to enrol in the course will be required to supply the key
e) Use group enrolment keys – means users are automatically added to the group when they enrol in the course.
f) Default assigned role – the default role for those self-enrolling is student, this can be changed if required
g) Enrolment duration – this is the length of time that the enrolment is valid (weeks, days, hours, minutes etc) If disabled, the enrolment duration will be unlimited.
h) Unenrol inactive after – defines whether users are automatically unenrolled after being inactive for a certain period of time
i) Max enrolled users – defines the maximum numbers of spaces in the course. Setting it to 0 means there are unlimited spaces
j) Send course welcome message – allows you to choose whether a welcome message is sent when students enrol
k) Custom welcome message – allows you to create your own welcome message. If you leave this blank the default welcome message will be sent
7) Click Save Changes

by Lingel Learning | Jan 12, 2014 | e-learning, LMS, Moodle
With the release of Internet Explorer 11, it seems many users are experiencing several issues when trying to play Flash-based content. There are still a lot of instructional designers out there developing eLearning courses for flash only viewing. Internet Explorer is one of the world’s most popular browsers and is deployed as the standard browser in most corporate SOEs (Standard Operating Environments).
There is still time before Internet Explorer 11 is rolled out across most corporate networks, but make sure your eLearning courses cater for the future. Ensure the Authoring Tool you use not only publishes to html5, but is optomised for mobile friendly viewing.


Recent Comments