
by Lingel Learning | Mar 5, 2015 | LMS, Moodle
Moodle has logs that can be accessed at site and course level. Logs are activity reports that can be filtered by required fields such as day, participants, activity, action or site.
Site activity logs
To generate your own site activity logs, following the steps below. (Please note you must have the administrator role)
1) Go to Settings > Site Administration > Reports > Logs
2) Select your desired logs by choosing options from dropdown lists

3) Click “Get these logs” button to view the list of logs
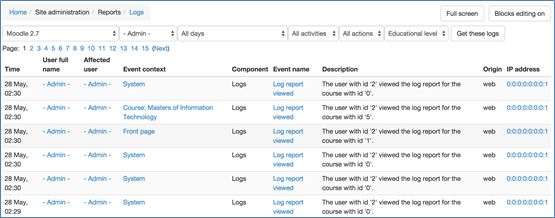
This list of logs activity describe all the information about log time, user name, what event occurred, which page, description with key fields and which IP address was used.
In the bottom of the list, there is “Download” button. Choose an option from the dropdown list and select which format (Excel or text or html) you want to download. Then click the “Download” button and save the log report.

You can view all logs by clicking the page numbers at the bottom of the window.
by Lingel Learning | Jan 19, 2015 | LMS, Moodle
Have you ever experienced trouble with your Articulate Storyline scorm files reporting back to Moodle?
You may experience this issue if your SCORM files do not have an assessment and you are relying on the SCORM file to Track using the number of slides viewed.
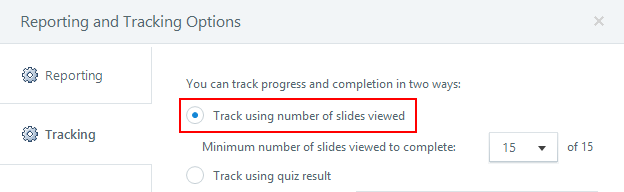
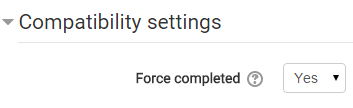
To ensure Moodle registers a learner’s completion it is recommended that you turn Force completed on in the SCORM setting.
To do this simply follow the instructions below:
1) Open your SCORM Settings
2) Navigate to Compatibility settings
3) Select Yes on the select box under Force completed
4) Click Save and return to course
by Lingel Learning | Sep 28, 2014 | LMS, Moodle
Have you ever wanted students to be able to self-enrol in a Moodle course? Let us take you through a step by step on how to enable self-enrolment in Moodle.
1) Click Course administration
2) Click Users
3) Click Enrolment methods
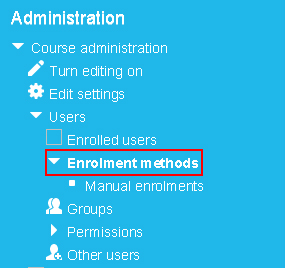
4) Click on the words Enrolment methods and you will see that Self enrolment (Student) is disabled
5) Click on the closed eye button to enable Self enrolment feature
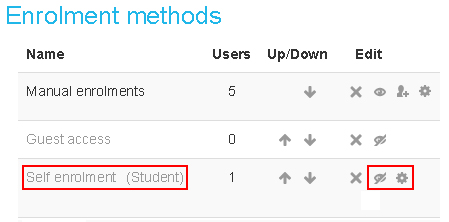
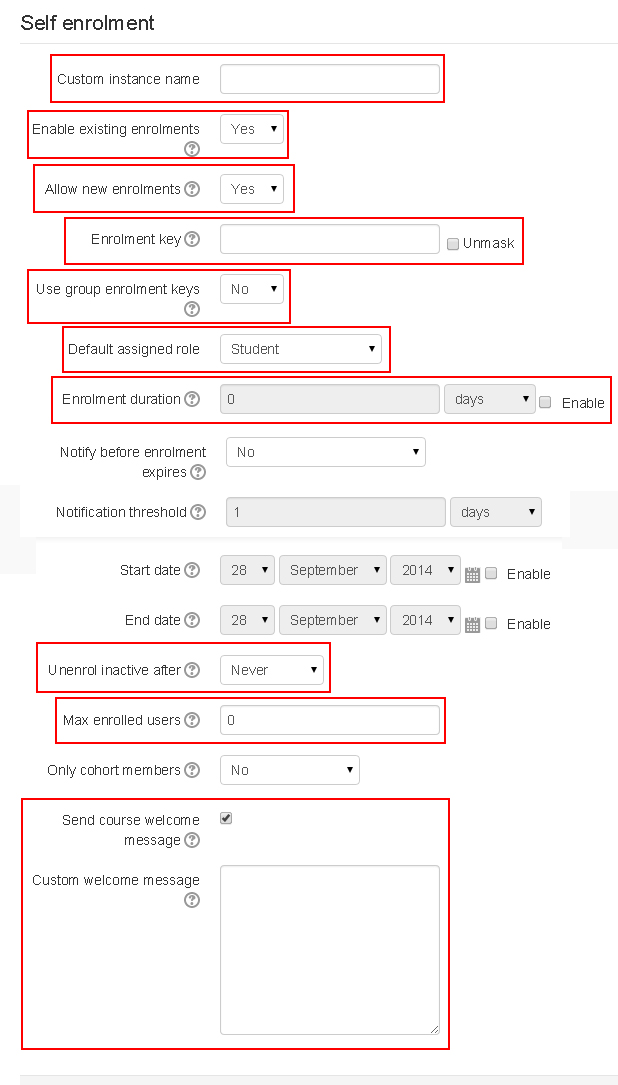
6) Click the Edit button to change the Settings of the Self Enrolment. Below outlines key fields you should be aware of:
a) Custom instance name – changes the default name from Self enrolment (Student) to a chosen name
b) Enable existing enrolments – if disabled all existing self enrolments are suspended and new users can not enrol.
c) Allow new enrolments – this setting determines whether a user can enrol into the course.
d) Enrolment key – an enrolment key enables access to the course to be restricted to only those who know the key. If the field is left blank, any user may enrol in the course. If an enrolment key is specified, any user attempting to enrol in the course will be required to supply the key
e) Use group enrolment keys – means users are automatically added to the group when they enrol in the course.
f) Default assigned role – the default role for those self-enrolling is student, this can be changed if required
g) Enrolment duration – this is the length of time that the enrolment is valid (weeks, days, hours, minutes etc) If disabled, the enrolment duration will be unlimited.
h) Unenrol inactive after – defines whether users are automatically unenrolled after being inactive for a certain period of time
i) Max enrolled users – defines the maximum numbers of spaces in the course. Setting it to 0 means there are unlimited spaces
j) Send course welcome message – allows you to choose whether a welcome message is sent when students enrol
k) Custom welcome message – allows you to create your own welcome message. If you leave this blank the default welcome message will be sent
7) Click Save Changes
by Lingel Learning | Feb 9, 2014 | Moodle
Have you ever wanted to create additional fields to store information about users? Follow the instruction below to find out how:
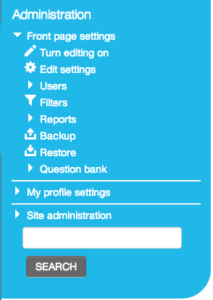
1) Go to Site Administration block (Administration in version 2.5 and above)
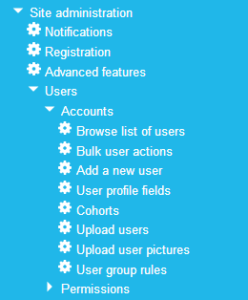
2) Click Users
3) Click Accounts
4) Click User profile fields
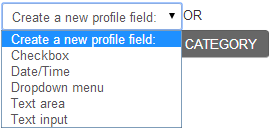
5) From the User profile fields screen click Create a new profile field select box
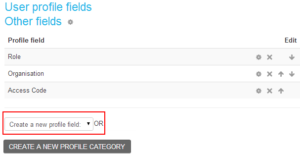
6) Select the most appropriate field you would like to create (e.g. Text input)
Checkbox (values can be true or false/yes or no/on or off)
Date/Time (date and an optional time field)
Menu of choices (selection of a value from a pre-defined list)
Text area (multiline formatted text)
Text input (single line of text or a number)
7) Click Text input and the common page settings will appear. Please note you must complete all required fields, denoted by a *
8) Under Common Settings, Enter a Short Name
9) Enter a Name
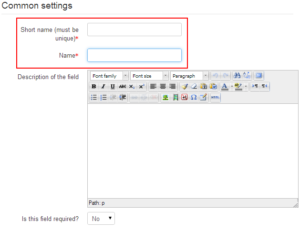
Please note the following fields are optional under the Common Setting:
Is this field required? – Set to Yes, if the field is to be made compulsory
Is this field locked? – Set to Yes, if the field will be locked to prevent the user from modifying it
Should the data be unique? – Set to Yes, if the value entered needs to be unique
Display on signup page? – Set to Yes, if the new field needs to be displayed on the signup page. (e.g. additional fields such as the address or previous qualifications)
Who is this field visible to? – This field can be set to one of the three visibility settings (Not visible, Visible to user and Visible to everyone)
Category – must be selected from the list of created values entered before the specific settings can be provided for each field type. Only newly-created categories can be selected. Default categories cannot be selected
Please note the following fields are optional under the Specific Setting:
Default value – defines a default value in a free-form textbox
Display size – size of textbox
Maximum length – length of textbox
Is this a password field? – specified if the field is a password field
Link – used to create dynamic links
Link target – where the link will be opened once selected
10) Click Save Changes
by Lingel Learning | Nov 28, 2013 | LMS, Moodle
Have you ever wanted to hide the navigation or settings block from a student or any block for that matter, and were not able to do it without getting the help of a programmer/developer. You do not need to be a programmer to do it. All you need to do is:
1) Go to Settings block (Administration in version 2.5 and above)
2) Click “turn editing on”
3) Go to the block you want to hide and click on Assign roles icon
4) Go to the block you want to hide and click on Assign roles icon

Recent Comments