Creating a backup in Moodle

Creating a backup in Moodle

Every now and then you come across a situation where you wish that you had taken a backup of your course in Moodle before you started making changes to the content or settings. If you are not careful while making changes, you might end up losing:

  • Student grades
  • Completion status
  • Course / Activity completion dates etc.

So to make sure you do not lose any data, you should take a backup of the course before you start making changes.

Moodle can be backed up in a number of different ways. It is important that whoever performs your Moodle backup knows what they are doing. You can use the following backups methods to perform backups for your Moodle installation:

Course Backup

Moodle allows you to backup individual courses as and when you need them and you can automate that too using the automated backup functionality. If you need to backup a single course in Moodle and or move a course from one Moodle site to another then a course backup is the easiest way to do it. Any user with editing rights can backup a course along with the user data and grades.

To perform a course backup, follow the steps below:

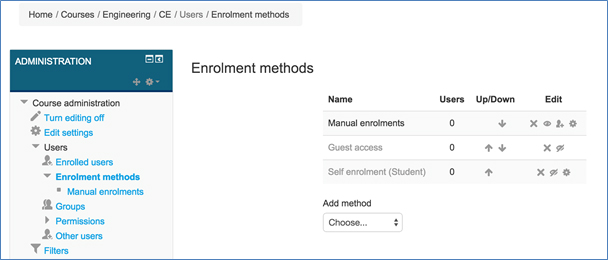
  1. Navigate to a course you wish to backup
  2. Under Course administration click Backup
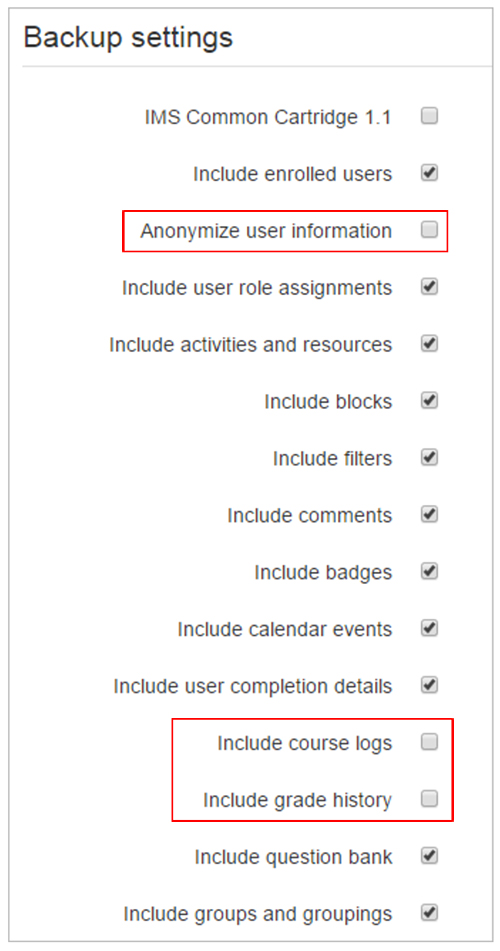
  3. You will be prompted to select what you want to include in the backup or just keep the default settings and click Next or Jump to Final Step to move all the steps and perform the backup
      • Please note: Course Logs and Grade History can be included in the backup, but are not selected by default. You can also Anonymize user information.

    Moodle backup settings

  4. On the Schema settings – Select/deselect specific items to include in backup, then click the Next
  5. Review the backup settings and click Previous if wish to make a change, otherwise click the Perform backup 
  6. Click the Continue


Course Backup (Automated)

To setup automated backups, follow the steps below:

  1. Navigate to “Site administration” -> “Courses” -> “Backups” -> “Automated backup setup”
  2. On the following page you need to set the following:
    • Active: Set this to “Enabled” to enable the automated backups
    • Schedule: Select the days that you want to run the backup. Backups can consume quite a few resources so you can set them to run on specific days.
    • Execute at: As mentioned above, backups need system resources, so you can schedule them to run on a specific time when the server is not that busy.
    • Automated backups storage: By default the backups are stored in Moodledata directory but, you can use this setting to change it to another directory on the server or use both.
    • Save to: If you decide to store the backups somewhere else too, use this setting to define the directory where you want the backups to be stored to.
    • Delete backups older than: This is similar to the setting above.
    • Minimum number of backup kept: If backups older than a specified number of days are deleted, it can happen that an inactive course ends up with no backup. To prevent this, a minimum number of backups kept should be specified.
    • Use course name in backup filename: You should use this if you want the course name as part of the backup filename.
    • Skip hidden courses: Do you want to skip hidden courses during the backup.
    • Skip courses not modified since: You can choose to skip the course if it hasn’t been modified for a certain time period.
    • Skip courses not modified since previous backup: You can also skip the courses that have been not been modified since your last backup.

Once setup, the administrator will get an email each night (depending on the schedule set above) after the backup is complete.

Site Backup

If you need to backup your entire Moodle site, then a site backup allows a site administrator to save everything associated with a Moodle site. These backups can be restored to bring a site back to the point in time when the backup was made.

You should always perform regular backups to safeguard against data lost information in the event of problem with your site and to speed the overall recovery process.

The following three items need to perform a complete site backup:

  1. Database
  2. Uploaded files (Files uploaded via Moodle in the moodledata directory)
  3. Moodle code (Everything in server/htdocs/moodle)

If you are unsure where to find these items are located in your Moodle installation by checking the config.php file.

Need further help?

If you need assistance with backing up Moodle, improving the performance of your site or an Moodle Health Check to ensure your LMS is running correctly, get in touch with us today.

Creating a backup in Moodle

How to enable paid enrolment using PayPal

If you want to set up paid courses, you can enable PayPal enrolment method. The PayPal enrolment plugin has to be enabled by the site administrator and then either administrator or manager can add the payment method to the course.

Let us take you through a step by step procedure on how to enable paid enrollment on a course in Moodle.

Course settings for PayPal

1) Go to your course and then click Settings > Course Administration > Users > Enrolment methods

 Course Settings for PayPal

2) If you do not find PayPal enrolment method in the list, you can choose PayPal from “Add Method” drop down list.

Moodle Enrolment Methods

3) When you choose PayPal from the dropdown list, you will be directed to PayPal course settings page where you can configure the following information.

  • Define a name “Custom Instance Name”
  • Choose “Yes” for Allow PayPal enrolments
  • Enter the cost of your course in “Enrol cost” filed.
  • Choose an appropriate currency from the “Currency” List
  • Select Student for the “Assign role”. If you have any special reason for allowing other users to enroll, you can choose other options.
  • Enter the enrolment duration, start date and end date. These fields are optional.
  • Click the “Add Method” button and save your changes.

4) Now you have enabled the payment method of “PayPal” to your course.

Admin Settings

If you do not have the ‘PayPal’ option in the ‘Add method’ dropdown list, you need to enable the plugin for ‘PayPal’ paid enrollment method.

1) Go to Settings > Site Administration > Plugins > Enrolments > Manage enroll plugins

2) Enable ‘PayPal’ plugin by clicking the ‘eye’ symbol

Moodle available courses enrolment settings

3) After you have enable the ‘PayPal’ plugin, Click the ‘Settings’ link, it will then direct to the PayPal settings page where you can configure the following information:

  • Enter the email of your Business PayPal account.
  • Choose the notify options for students, teachers or admin
  • Select Enrolment expiration action

Moodle PayPal Module

  • You can choose to allow the PayPal enrolment plugin by default in new courses by selecting ‘Yes’ option.
  • Enter a default cost value and currency
  • Choose a default role assignment (e,g. student)
  • Given a default enrolment period

Moodle enrolment instance defaults

Finally click the ‘Save Changes’ button to save and complete the PayPal’ enrolment plugin.

Creating a backup in Moodle

How to view logs in Moodle

Moodle has logs that can be accessed at site and course level. Logs are activity reports that can be filtered by required fields such as day, participants, activity, action or site.

Site activity logs

To generate your own site activity logs, following the steps below. (Please note  you must have the administrator role)

1) Go to Settings > Site Administration > Reports > Logs
2) Select your desired logs by choosing options from dropdown lists

View Logs

3) Click “Get these logs” button to view the list of logs

Get Logs

This list of logs activity describe all the information about log time, user name, what event occurred, which page, description with key fields and which IP address was used.

In the bottom of the list, there is “Download” button. Choose an option from the dropdown list and select which format (Excel or text or html) you want to download. Then click the “Download” button and save the log report.

Download Logs

You can view all logs by clicking the page numbers at the bottom of the window.

Creating a backup in Moodle

How to ensure your SCORM files report back to Moodle

Have you ever experienced trouble with your Articulate Storyline scorm files reporting back to Moodle?

You may experience this issue if your SCORM files do not have an assessment and you are relying on the SCORM file to Track using the number of slides viewed.

Moodle Force Completed

To ensure Moodle registers a learner’s completion it is recommended that you turn Force completed on in the SCORM setting.

To do this simply follow the instructions below:

1) Open your SCORM Settings

2) Navigate to Compatibility settings

3) Select Yes on the select box under Force completed

4) Click Save and return to course

Moodle Compatibility Settings

Creating a backup in Moodle

How to enable self-enrolment in Moodle

Have you ever wanted students to be able to self-enrol in a Moodle course? Let us take you through a step by step on how to enable self-enrolment in Moodle.

1) Click Course administration
2) Click Users
3) Click Enrolment methods

Administration Menu

4) Click on the words Enrolment methods and you will see that Self enrolment (Student) is disabled
5) Click on the closed eye button to enable Self enrolment feature

Self enrolment

6) Click the Edit button to change the Settings of the Self Enrolment. Below outlines key fields you should be aware of:

a) Custom instance name – changes the default name from Self enrolment (Student) to a chosen name
b) Enable existing enrolments – if disabled all existing self enrolments are suspended and new users can not enrol.
c) Allow new enrolments – this setting determines whether a user can enrol into the course.
d) Enrolment key – an enrolment key enables access to the course to be restricted to only those who know the key. If the field is left blank, any user may enrol in the course. If an enrolment key is specified, any user attempting to enrol in the course will be required to supply the key
e) Use group enrolment keys – means users are automatically added to the group when they enrol in the course.
f) Default assigned role  – the default role for those self-enrolling is student, this can be changed if required
g) Enrolment duration – this is the length of time that the enrolment is valid (weeks, days, hours, minutes etc) If disabled, the enrolment duration will be unlimited.
h) Unenrol inactive after – defines whether users are automatically unenrolled after being inactive for a certain period of time
i) Max enrolled users – defines the maximum numbers of spaces in the course. Setting it to 0 means there are unlimited spaces
j) Send course welcome message – allows you to choose whether a welcome message is sent when students enrol
k) Custom welcome message – allows you to create your own welcome message. If you leave this blank the default welcome message will be sent

7) Click Save Changes 

Self enrolment settings