Have you ever wanted to create additional fields to store information about users? Follow the instruction below to find out how:
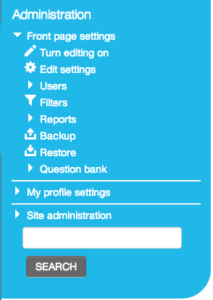
1) Go to Site Administration block (Administration in version 2.5 and above)
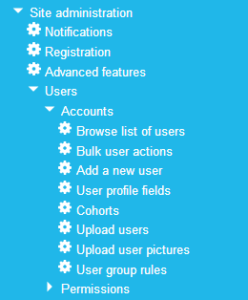
2) Click Users
3) Click Accounts
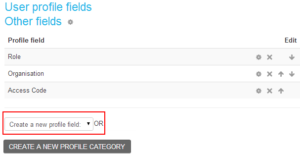
4) Click User profile fields
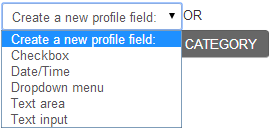
5) From the User profile fields screen click Create a new profile field select box
6) Select the most appropriate field you would like to create (e.g. Text input)
Checkbox (values can be true or false/yes or no/on or off)
Date/Time (date and an optional time field)
Menu of choices (selection of a value from a pre-defined list)
Text area (multiline formatted text)
Text input (single line of text or a number)
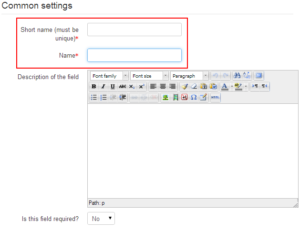
7) Click Text input and the common page settings will appear. Please note you must complete all required fields, denoted by a *
8) Under Common Settings, Enter a Short Name
9) Enter a Name
Please note the following fields are optional under the Common Setting:
Is this field required? – Set to Yes, if the field is to be made compulsory
Is this field locked? – Set to Yes, if the field will be locked to prevent the user from modifying it
Should the data be unique? – Set to Yes, if the value entered needs to be unique
Display on signup page? – Set to Yes, if the new field needs to be displayed on the signup page. (e.g. additional fields such as the address or previous qualifications)
Who is this field visible to? – This field can be set to one of the three visibility settings (Not visible, Visible to user and Visible to everyone)
Category – must be selected from the list of created values entered before the specific settings can be provided for each field type. Only newly-created categories can be selected. Default categories cannot be selected
Please note the following fields are optional under the Specific Setting:
Default value – defines a default value in a free-form textbox
Display size – size of textbox
Maximum length – length of textbox
Is this a password field? – specified if the field is a password field
Link – used to create dynamic links
Link target – where the link will be opened once selected
With the release of Internet Explorer 11, it seems many users are experiencing several issues when trying to play Flash-based content. There are still a lot of instructional designers out there developing eLearning courses for flash only viewing. Internet Explorer is one of the world’s most popular browsers and is deployed as the standard browser in most corporate SOEs (Standard Operating Environments).
There is still time before Internet Explorer 11 is rolled out across most corporate networks, but make sure your eLearning courses cater for the future. Ensure the Authoring Tool you use not only publishes to html5, but is optomised for mobile friendly viewing.
There are many companies out there that have a Learning Management Systems (LMS), but they don’t take advantage of their Intranets to promote and alert staff to upcoming training. SharePoint is a powerful intranet that provides an amazing array of features and there are great ways to connect your LMS and SharePoint Intranet together. Some simple ways to integrate your LMS with SharePoint include:
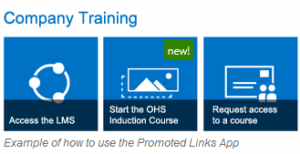
Promoted Links
Use a Promoted Links App (SP2013) or a Links List Web Part (SP2010) on the homepage of your Intranet, that way staff have a direct link to your LMS. Don’t bury your links deep inside your Intranet, bring them to the homepage where they belong.
If you want to take it a step further you can even audience target your links via security group. This is a great way to tailor links to either a department or individual users, making it even easier to alerts users to upcoming or outstanding courses.
Workflow Approval
Take advantage of SharePoint’s out of the box approval workflow and create an email approval that allows staff to request access to available training courses. The workflow can then obtain approval from the appropriate management and then be workflowed to a LMS administrator who can grant access to the course.
Training Dashboard
If you would like a complete LMS integration, why not use Business Connectivity Services to extract course attendance and course results, then publish this information into a dashboard inside SharePoint, so management can stay up to date with staff training.
Contact Lingel Learning today to find out how we can help your Moodle LMS work with SharePoint.
Have you ever wanted to hide the navigation or settings block from a student or any block for that matter, and were not able to do it without getting the help of a programmer/developer. You do not need to be a programmer to do it. All you need to do is:
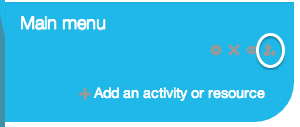
1) Go to Settings block (Administration in version 2.5 and above)
2) Click “turn editing on”
3) Go to the block you want to hide and click on Assign roles icon
4) Go to the block you want to hide and click on Assign roles icon
Moodle™ is an acronym for ‘Modular Object-Oriented Dynamic Learning Environment’. It provides a central space on the web where students can access a set of tools, resources and courses anytime anywhere.
Moodle is the most popular and trusted learning management system that caters for all types of organisations, no matter how large.
This video provides a great overview of Moodle and what’s all about.


Recent Comments